
This guide walks you through the process of connecting your Kryptor board to a Raspberry Pi (any other SBC with SPI would do) and utilizing it for encryption and decryption tasks. We'll cover:
- Hardware Setup: We'll show you how to physically connect the Kryptor board to your Raspberry Pi using the SPI interface.
- Raspberry Pi Configuration: Learn how to configure your Raspberry Pi to activate the SPI interface for communication with the Kryptor board.
- Command Line Interface Access: We'll guide you through setting up access to the Kryptor board's Command Line Interface (CLI) from your Windows or macOS machine.
NOTE: ensure your Kryptor board has been programmed (via JTAG interface) with the proper HSM softcore. See the related tutorial.
1. Preparations
1.1 Connect "SKUDO Kryptor" board to the Raspberry Pi
Place the PCB on a breadboard and connect it with F-M (Female-Male) jumper wires to Raspberry Pi’s GPIO connectors SPI pins according to the connection diagram below. Alternatively you can avoid using a breadboard and connect the two boards (Kryptor and RPi) directly using F-F jumper wires (10cm short ones are preferable).
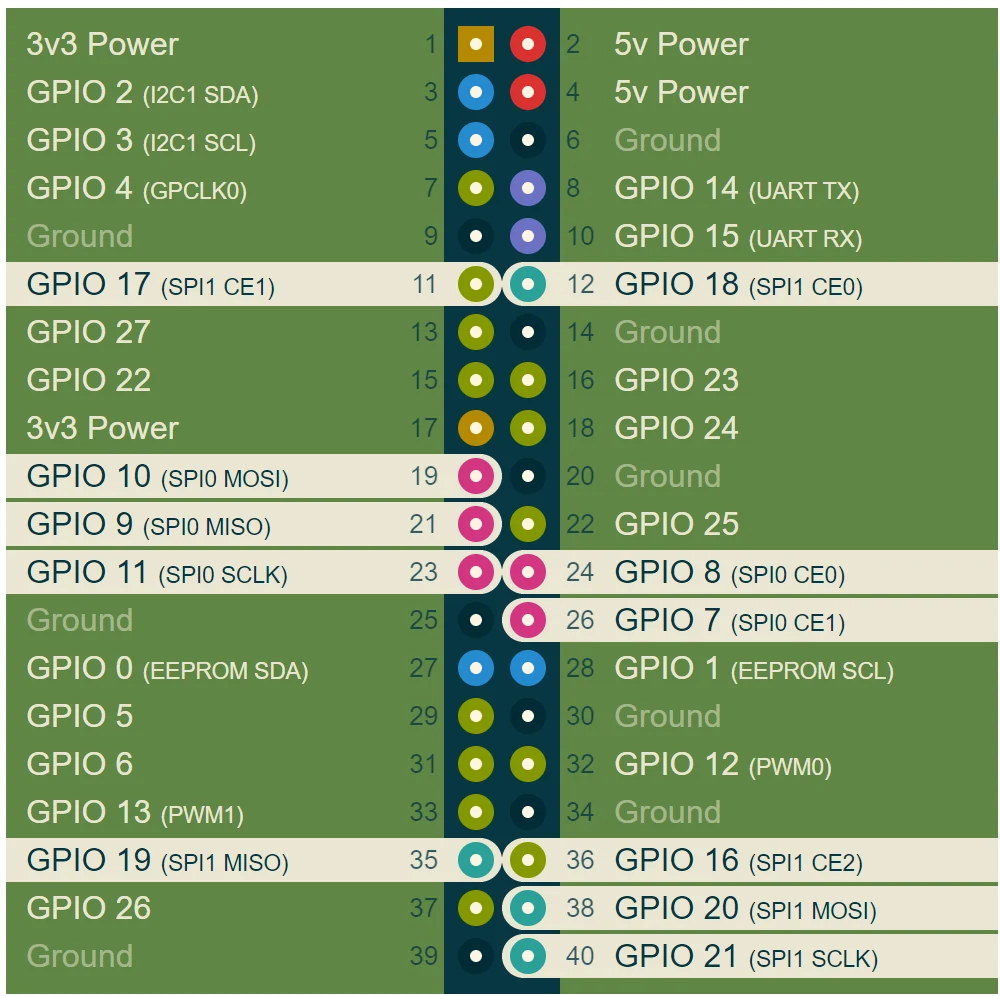
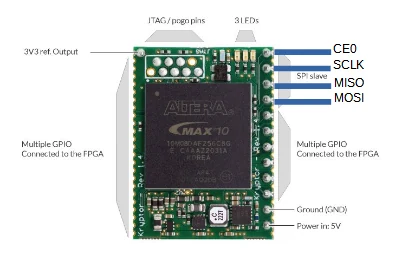
NOTE: Make sure that the Raspberry Pi is not powered when you connect the wires (jumper cables).

Once connected verify that your board's led is blinking red on and off at regular interval (about 1 second). See the following video:
1.2 Enable SPI
By default, the SPI is disabled on most RPi boards. To enable it you need to execute (with root privileges) the "raspi-config" command.
pi@Rpi3-192.168.1.117:~/CS $ sudo raspi-config
Which will show the following text menu:
┌─────────┤ Raspberry Pi Software Configuration Tool (raspi-config) ├──────────┐
│                                                                              │
│       1 System Options       Configure system settings                       │
│       2 Display Options      Configure display settings                      │
│       3 Interface Options    Configure connections to peripherals            │
│       4 Performance Options  Configure performance settings                  │
│       5 Localisation Options Configure language and regional settings        │
│       6 Advanced Options     Configure advanced settings                     │
│       8 Update               Update this tool to the latest version          │
│       9 About raspi-config   Information about this configuration tool       │
│                                                                              │
│                                                                              │
│                                                                              │
│                                                                              │
│                                                                              │
│                     <Select>                     <Finish>                    │
│                                                                              │
└──────────────────────────────────────────────────────────────────────────────┘
Select the option 3 (Interface) and then pick the SPI, enable it and then exit. Nothing more to do.
1.3 Install the CLI software into the RPi
There is no special installation as all you need to do is copy the CLI executable (single file) in your working directory
2. First test
2.1 Executing the "-m" command
As a first test, you can run the CLI with the parameter "-m". If the board is properly connected (remember also to enable the SPI on the RPi) then you should get some data text printed on the screen as in the following example:
pi@Rpi3-192.168.1.117:~/CS $ ./hsm_cli -m
Vendor: Skudo OÜ (www.skudo.tech)
Product: HSM/FPGA v1.5
Serial: RL9V-78UU-ECCM-8K44
pi@Rpi3-192.168.1.117:~/CS $
The "serial number" uniquely identifies the FPGA chip on your board.
3. Troubleshooting
These are most common errors:
- If the "-m" command returns error or no data
Please check the SPI wires are properly connected and that the SPI interface is axctive on the RPi (or other used device) - If the red led on the board is not blinking regularily (heartbeat) then ensure the correct 5V is applied to the board
4. History
Jan 2024 - First version 1.0